lauantai 21. syyskuuta 2013

Setting Up Raspberry Pi Server

I wanted to re install my Raspberry Pi. http://nikinlinux.blogspot.fi/2013/03/raspberry-pi-credit-card-sized-computer.html


First go to:
http://www.raspberrypi.org/downloads
And download Raspbian Image 2013-09-10-wheezy-raspbian.zip

Download also Win32DiskImager from the same site. Extract the Win32DiskImager somewhere on your computer for example Desktop. 

Insert your memory card into computer.
Open the DiskImager software, press the icon that looks like a folder and search for your raspbian image. Also check that the device is pointing to your memory card. Click write.


After the file is writed click OK and insert it to your raspberry Pi. Then plug in all the cables and power plug at last. It should boot up and show you the raspberry pi config window.


1. First select Expand Filesystem if you want to use whole memory card as disk space and often people do. The space is created after next reboot.
2. If you want to change the PI account default password select this. Default password is raspberry
4. Select keyboard layout from here and system time settings.


7. Overclocking is a new tool, you can overclock your raspberry pi and it is so simple check it out!
8. Then go to advanced options if you are going to use raspberry pi as a server, otherwise you are ready and can skip few next steps.


From advanced options it is good to set up hostname for your server. It sets the visible name for PI on your local network (A2).
(A3) Memory split, with this option you can select how much memory is dedicated to the GPU if you are using the graphical user interface you should give it as much memory as possible. We are going to set up a server so I'm going to use only command line and therefore I set up it as low as possible, in this case 16mb.
(A4) SSH, if you want to acces your server from other computer you have to turn this on. We are going to configure our server from windows computer so set this on.
Now you are finished. Go back and finish. If it doesn't reboot just pull the plug off the PI and in again.

Now it should show you the raspberry pi terminal:


Just to make sure type service ssh status to see if the service has started.


 Then check your IP address by typing ifconfig


Look for a line which says: inet addr: write down the ip after that. It's the IP your router has given to PI.

Then you can pull off all the cables but power and ethernet. Your PI is ready to be configured from other computer. However if you would like to use the graphical environment type startx in the terminal window and it should load. 


Go to your windows computer and download putty.exe http://www.chiark.greenend.org.uk/~sgtatham/putty/download.html

In putty window type your PI ip address we just looked before and leave port 22. Then connect.


Pi should ask your password and after you have entered it you should see the welcome message


Security

Now we want to make our server as secure as possible. Lets add a new user and delete the default PI account.

type sudo useradd -m accountname where "accountname" is your account name. 
Set password for your account type: sudo passwd accountname
Now lets add our new account to same groups as PI. type sudoedit /etc/group
Go through the file adding your account ,accountname to the end of all the groups that pi is in. For example my account name is shnigi.


When you are ready press CTRL + O to save, press enter and then CTRL + X to quit nano. All nano command are visible in the bottom of the terminal screen. Mark ^ means CTRL + letter. Of course if you just want to add other user in PI you don't need to go through this file. Now type exit and try to log in your other account. It should give you the welcome message again.

Next set the default shell for your new account when you have logged in with it. Type:
chsh -s /bin/bash
After this you could delete the PI account if it is no longer required. Of course there are also a lot of other aspects to make PI more secure. 

Setting up the networking

Next step is to give the Raspberry Pi an static IP address. This is a little more complex as it depends upon your own setup and router. How to configure your router I suggest you to check: http://portforward.com/ for more information. This article is only about Raspberry Pi.

If you again type ifconfig to the terminal it will show your address in eth0


Also check your router address by typing route


To change to static IP address type

cd /etc/network
sudo nano interfaces

replace the line "iface eth0 inet dhcp" like in this picture. Of course use your addresses from the earlier steps we just did.


CTRL + O to save CTRL + X to exit nano. Next type cd .. and nano resolv.conf to make sure your nameserver is set up correctly.

Next it is good idea to reboot the pi with  sudo reboot wait few minutes and connect again with putty. After logging in check using ifconfig to confirm that you have a static IP address. All done. Now just set up your router and start installing LAMP for example.

start by updating repositories:
sudo apt-get update 
Install apache web server
sudo apt-get install apache2
Install MySQL server
sudo apt-get install mysql-server
during the installation mysql asks to set root password.


Perl is installed as part of the operating system so just add php.
sudo apt-get install php5
sudo apt-get install php5-mysql

LAMP stack is now installed. You can check if you see the apache welcome page by pointing your browser to PI's IP address.


Next we are going to install phpmyadmin graphical user interface for MySQL
sudo apt-get install phpmyadmin
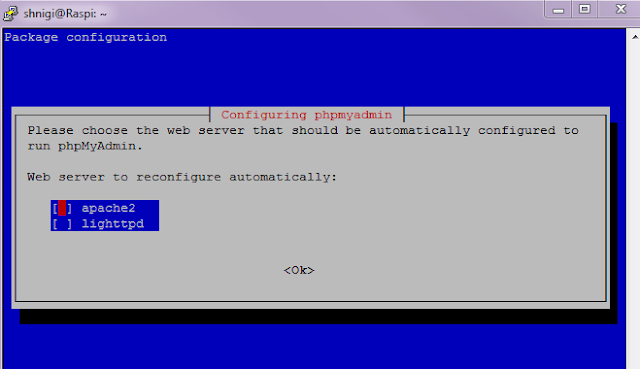


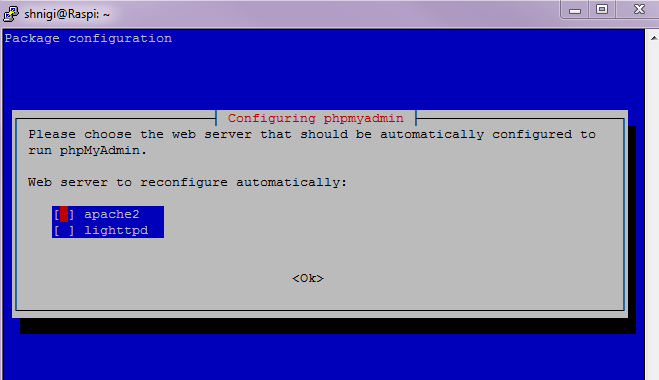
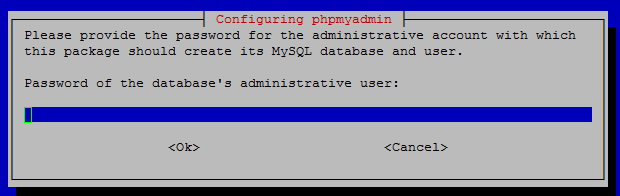
it will ask web server to configure, select apache2. It will also ask to create database, select yes.
Set phpmyadmin password.
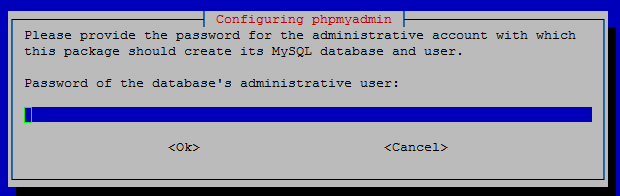

Create a symbolic link for phpmyadmin to be accessed from the internet. If you want more secure server skip this step. Phpmyadmin propably has some sort or risks and it is always more secure to use it locally. 

sudo ln -s /usr/share/phpmyadmin/ /var/www/phpmyadmin
Then restart apache to take changes
sudo service apache2 restart


type http://yourPi-IP/phpmyadmin to acces your phpmyadmin 
Test if php is working:
sudoedit /var/www/index.php
Insert this code:
<html>
 <head>
  <title>PHP Test</title>
 </head>
 <body>
 <?php echo '<p>Hello World</p>'; ?>
 </body>
</html>
Save and quit nano. Type to your browser: localhost/index.php
If you see this, it works:

tiistai 17. syyskuuta 2013

Metapackages (HowTo) Packagin a script and about apt-get

This time we are going to install multiple programs with apt-get and create a metapackage (.deb) file. To create a .deb file you will need at least two programs, but we are going to use three. The third one is for checking the package.

To update repositories and install all the tools with single command type this to terminal:

sudo apt-get update && sudo apt-get -y install equivs lintian gdebi

GDebi is a tool that can install .deb packages. It is available with a graphical interface, but also has a command line option.

Lintian checks Debian software packages for common inconsistencies and errors.

Equivs is a dummy package which can be used to create Debian packages, which only contain dependency information. This way, you can make the Debian package management system believe that equivalents to packages on which other packages do depend on are actually installed.

First we are going to create that dummy file for our .deb

equivs-control nikis-favouriteprograms.cfg

(replace nikis-favouriteprograms with your own package name. It has to be unique.)
 open it with nano for example.

nano nikis-favouriteprograms.cfg


Edit at least these lines and remember to remove # comment mark from the start:
Package with your package name without .cfg
Version add it like 0.0.1 and remember, you can never go back with the version number !
Maintainer Enter your name or who ever is going to maintain the package, also email address
Depends Here you can enter the depends, for example apache2, nmon etc...

Like this:


 CTRL + O to save, press enter and CTRL + X to exit.

Then time to build your package:

equivs-build nikis-favouriteprograms.cfg


Next try your package with Lintian.

lintian nikis-favouriteprograms_0.0.1_all.deb

if terminal gives no warnings and returns new empty line your package is fine.

Next install your package.

sudo gdebi -n nikis-favouriteprograms_0.0.1_all.deb

Your package should install and you can pat yourself on the shoulder.


Notice: my package couldn't install first because chromium was chromium-browser.

Original instructions: http://terokarvinen.com/2011/create-deb-metapackage-in-5-minutes

Wrapping a script in .deb file

Do the same steps as before but create a shell script for example which you want to pack.  For example http://nikinlinux.blogspot.fi/2013/08/creating-shell-script.html
Put the script in the same folder as the .cfg.


Give your shellscript execute permissions chmod 755 mystatus.sh

Then edit the cfg file a little bit, you can leave depencies blank if you want, remove the comment from option "File" and after that enter your shellscript name, one space and path to install for example /home.


Then build your package and install it to see if it is working. Mine worked.


perjantai 13. syyskuuta 2013

Criminals and good citizens - Scan Of The Month 15 (How To Recover Deleted Files)

Our hometask was to download Scan of the month 15 and recover deleted rootkit from the / partition

On 15 March. 2001, a Linux honeypot was successfully compromised, a rootkit was download to the / partition and then deleted from the system. Your mission is to find and recover the deleted rootkit. If you are not sure where to begin on conducting this forensic analysis and recover the rootkit, we highly reccommend you start with the Forensic Challenge. The steps you will have to follow for the rootkit recovery are similar to the steps discussed there. We have posted only the / partion for download to keep this challenge simple. The compressed image is 13MB, (honeynet.tar.gz) MD5=0dff8fb9fe022ea80d8f1a4e4ae33e21. Once you have downloaded, untarred, and unzipped the partition image, it will be 255 MB and the checksum should be MD5=5a8ebf5725b15e563c825be85f2f852e.
  1. Show step by step how you identify and recover the deleted rootkit from the / partition.
  2. What files make up the deleted rootkit?
Bonus Question: 
Was the rootkit ever actually installed on the system? How do you know?

Source: http://old.honeynet.org/scans/scan15/

Lets start.

Open up terminal and type
sudo apt-get update
then copy the download link from honeynet or just download it from there. However I used
wget http://old.honeynet.org/scans/scan15/honeynet.tar.gz
I downloaded it in to my home folder and then untarred it with
tar -xvf honeynet.tar.gz
where -x = Extract files from an archive
-v = verbosely list files processed
-f = use archive file or device archive

SUMMARY
-------
You have download the / partition of a compromised RH 6.2
Linux box.  Your mission is to recover the deleted rootkit
from the / partition.

What is rootkit actually ? 

From Wikipedia: " rootkit is a stealthy type of software, often malicious, designed to hide the existence of certain processes or programs from normal methods of detection and enable continued privileged access to a computer"

So basically rootkit is not a virus which sabotages your computer. Its basic idea is to hide itself from users and give root access to someone else who then can steal your documents or somehow make changes to the system. It is a "kit" which contain files to give "root" access to the marauder.

then I downloaded autopsy to do the forensics
sudo apt-get install autopsy

What is autopsy ?
http://www.sleuthkit.org/

"Autopsy™ is a digital forensics platform and graphical interface to The Sleuth Kit™ and other digital forensics tools. It can be used by law enforcement, military, and corporate examiners to investigate what happened on a computer. You can even use it to recover photos from your camera's memory card."


 This is what I have so far done. Now lets open autopsy. 

Type sudo autopsy and leave the terminal open. Open your browser and type http://localhost:9999/autopsy and you will see autopsy front page.


Obviously click "new case" button and fill all the information.

Then add host.


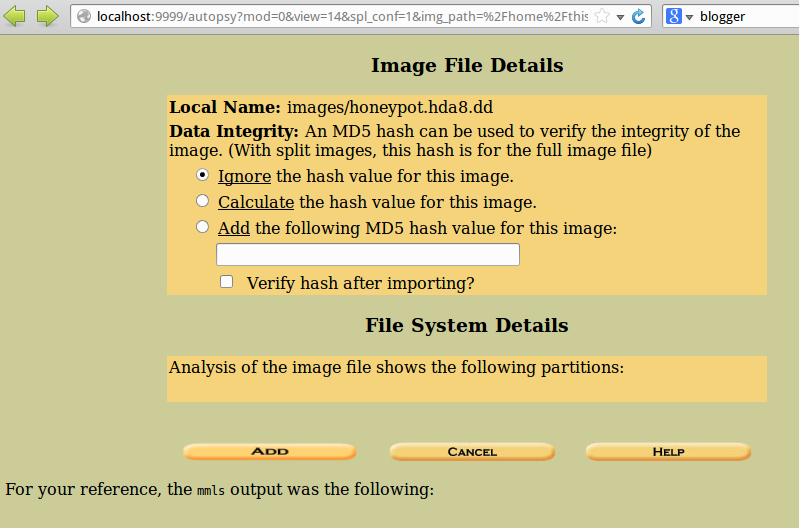
After that add your image


Enter image path. For example my image was in /home/this/honeynet/honeynet/honeypot.hda8.dd


Select Volume!


Then just add.


All preparations done. Now click analyze to begin.


How  to recover deleted files

cd to your honeynet folder where the image file is stored. Then create two new folders

mkdir allocated deleted
Then type
tsk_recover -a honeypot.hda8.dd allocated/
tsk_recover honeypot.hda8.dd deleted/


As you can see it recovered some files.


Good tutorial for terminal file recovery:

"If you are doing forensic analysis, be careful: never run files that could be hostile."

"If you are doing forensic analysis with potentially hostile software, don’t use production machines or computers with sensitive information."

So what we know about the image ?

You have download the / partition of a compromised RH 6.2
Linux box.  Your mission is to recover the deleted rootkit
from the / partition.   Below are a list of all the partitions
that made up the compromised system.

/dev/hda8       /      <----- The partition you downloaded
/dev/hda1       /boot
/dev/hda6       /home
/dev/hda5       /usr
/dev/hda7       /var
/dev/hda9       swap

I opened my autopsy and noticed right away from the front page two deleted files.


The .tgz file was interesting so I decided to untar it.

 this@this:~/honeynet/honeynet/deleted$ tar -xvf lk.tgz
last/


It created a folder named last. As you can see from the picture above, there is a folder named last which is deleted. I started to look what kind of files it contained because I managed to recover the folder from tar file.


It contained files for ssh and file named linsniffer which is very suspicious. If you look files, modified date from properties, we can see these are created before 15 March. 2001 when the rootkit was deleted.


The install file was very interesting. I opened it with nano

nano install


 And it revealed something very interesting =) Then I googled the linsniffer because sniffing sounds so suspicious. What is linsniffer ? returned: Powerful Linux ethernet sniffer  

"linsniffer is an ethernet sniffer. It sits and listens on a network and grabs every packet it sees. This is why ssh is a good thing…"

So it seems the sniffer was part of the rootkit and from install packet which is image above we can see clearly a text saying: Rootkitului so I can almost clearly say this is the rootkit. 

Then I looked a little bit the sshd config file:


It has been set to accept empty passwords. If this machine were production server it would absolutely not accept empty passwords if it has been set up right!

IP address

The install file included some IP addresses. I then put them into IP location finder http://www.iplocation.net/index.php and the IP pointed to Romania so we can suspect that the rootkit came from there unless it was installed through proxy server.


And then to the questions from Scan of the month: 

1. Show step by step how you identify and recover the deleted rootkit from the / partition.

Use autopsy / sleuthkit to see what files have been deleted from / and then recover them with terminal commands.

2. What files make up the deleted rootkit?

All files that were under /last folder.

Bonus Question:
Was the rootkit ever actually installed on the system?
How do you know?

Will see if I have time to solve this. But I know it can be solved.


maanantai 9. syyskuuta 2013

Explainshell. Learn shell commands

http://explainshell.com/

otherwise use man

Mount network drive with sshfs

If you want to mount a network drive to your Linux system it is very easy to do with sshfs.

Upgrade repositories first:
sudo apt-get update
then install sshfs with
sudo apt-get install sshfs

then create a new folder somewhere where you want to mount it, for example in my case
cd
mkdir myy

then to mount it type:
sshfs username@serverip: myy

and after the : you can specify location on server to mount.

To unmount type sudo umount foldername
In this case sudo umount myy


keskiviikko 4. syyskuuta 2013

Server Monitoring and Munin (ubuntu 13.04)

Monitoring tools


First I am going to use some basic commands to find useful information about my server.

top 

this command shows a lot of information. Computer uptime, how long your server has been running, how many users. How many tasks are running, how much memory and cpu programs are using. WA is your computer disk waiting time. If it grows very big it means your hard drive isn't fast enough to serve. It may mean you have a slow/defective disk. Kill top with CTRL + C


free -m

this command shows how much memory your computer is using and how much is free. This is useful if you don't know how much memory your computer have or you have to look if the computer is running out of memory.


Next command is sudo iotop -oa before you can run this ocmmand you need to install iotop with sudo apt-get install iotop

Iotop shows your hard drive read and write speed. Both of these are recorded here. Kill it with CTRL + C


Stress test

In some cases you might want to stress your computer and see how it performances or will it overheat. For example you have just bought new pc. Stress it for few hours and see if it breaks. If not you can be sure it won't overheat in first pike. Start by installing stress.

sudo apt-get install stress

Start with the example stress test and then increase time if wanted. Open a new terminal at the same time and type top to see how it will stress the cpu.

stress --cpu 8 --io 4 --vm 2 --vm-bytes 128M --timeout 10s


Munin

"Munin is a networked resource monitoring tool that can help analyze resource trends and "what just happened to kill our performance?" problems. It is designed to be very plug and play. A default installation provides a lot of graphs with almost no work."

In this post we are going to look how our server is doing. Server administrator should know what is normal behavior and what is not. We are going to use Munin which prints some graphics for us and stress the computer little bit.

First install apache2 so we can get some graphs online. Update your repositories first.

sudo apt-get update  
sudo apt-get install apache2

Start by installing Munin.

sudo apt-get install munin

we want to see Munin graphs from anywhere so we need to edit its config file.

sudoedit /etc/munin/munin.conf

Outcomment these lines and also edit htmldir to your wanted folder. I am going to create that munin folder specified here:

dbdir /var/lib/munin
htmldir /var/www/munin
logdir /var/log/munin
rundir /var/run/munin

tmpldir /etc/munin/templates


Next we create the directory /var/www/munin and change its ownership to the user and group munin, otherwise munin cannot place its output in that directory. Then we restart munin:

mkdir -p /var/www/munin
chown munin:munin /var/www/munin
/etc/init.d/munin-node restart 


Now wait a few minutes so that munin can produce its first output, and then go to http://localhost/munin in your browser, and you see the first statistics.


Password protection!

You should protect your statistics unless you want that everyone can see every little details about your server.

We are going to create .htaccess file in /var/www/munin

To do that type sudoedit /var/www/munin/ .htaccess

copy paste this to the .htaccess file: 


AuthType Basic
AuthName "Admin Only"
AuthUserFile /var/www/munin/.htpasswd
<limit GET PUT POST>
require valid-user
</limit>


Then we must create the password file /var/www/munin/.htpasswd.

Pick your admin name, for example admin. and type into terminal:
sudo htpasswd -c /var/www/munin/ .htpasswd admin 

Enter a password for admin, and then we are going to change apache2 settings.
Edit apache default settings by adding this:


sudoedit /etc/apache2/sites-available/default

<Directory /var/www/munin/>
        AllowOverride AuthConfig
        AuthName "Please insert your login data."
        AuthType Basic
        AuthUserFile /var/www/munin/.htpasswd
        AuthGroupFile /dev/null
        require user admin
    </Directory>

 sudo service apache2 restart

Now try localhost/munin and it asks login details!


Original instructions:
http://www.howtoforge.com/server_monitoring_monit_munin

Graphs

Go to Munin page, select localdomain and eth0 traffic. This graph shows the traffic of the eth0 network interface. Means how much traffic your network has.


My "server" was online about 1,5 hours and this is the graph I got. Not very much traffic.

Next we are picking CPU usage. This graph shows how CPU time is spent.


If I understood this graph well, the cpu is not doing very much. There is small 100% pike which is because of the stress test. Very useful information. 

Last one is Memory usage. As we can see this graph shows average, current and max memory usage. Very useful graph to see at what times your server is using more ram and is it enough.