maanantai 14. lokakuuta 2013

Usefull commands (Personal note)

Create a file.txt file which tells you every service installed on your computer.
sudo service --status-all >> file.txt

Check Linux information:
lsb_release -a

List all users on your computer
awk -F: '$6 ~ /\/home/ && $3 >= 500 {print $1}' /etc/passwd

Create python file that can be run from anywhere (helloworld.py)
#!/usr/bin/env python
print "Hello, World!"
Give chmod 755 to the helloworld file and try running it from somewhere. Or execute chmod +x helloworld.py

List file permissions
ls -l

Change file owner
sudo chown seppo hellurei.py 

Change your password
passwd

Protect your file from others
chmod og-rwx users.txt

List password hash
sudo cat /etc/shadow

Commands for Firewall
ufw enable – turn on the firewall
ufw disable – turn off the firewall
ufw default allow – allow all connections by default
ufw default deny – drop all connections by default
ufw status – current rules and
ufw allow port – to allow traffic on port
ufw deny port – port block
ufw deny from ip – ip block

Commands for Package Manager.
apt-get update – refresh updates available
apt-get upgrade – update all packages
apt-get dist-upgrade – version update
apt-get install pkg – installing pkg
apt-get remove pkg – uninstall pkg
apt-get autoremove – removing packages obsotletos
apt-get -f install – try to fix packages
dpkg –configure -a – try to fix a broken package
dpkg -i pkg.deb – install file pkg.deb
(file) /etc/apt/sources.list – list of repositories APT

See all open ports for your machine
netstat -anltp | grep "LISTEN" 

Start web server serving current directory tree at http://localhost:8000/ (No admin rights needed)
python -m SimpleHTTPServer


Giving root access 
either this one
 sudo adduser vogella admin 
or this one should work
 sudo adduser vogella sudo

Set up backup with timing command
sudo crontab -e

Disable screensaver
xset s 0 0 (times in seconds, 0 means off) and you can turn power management off by command: xset -dpms and on by xset +dpms

How to use grep: ls -l|grep mystatus.sh 

tiistai 8. lokakuuta 2013

Varnish - a web application accelerator (How To Setup Varnish On Linux)

"Varnish is a web application accelerator. You install it in front of your web application and it will speed it up significantly." Varnish kinda does a static copy of your web page and loads it to ram memory. Static web page is a lot faster to serve than page with dynamic content as I demonstrated in the post below.

Prerequisites:
Apache2
Dynamic and static page for testing for example Wordpress

Step one. Install Varnish
sudo apt-get install varnish

Step two. Configure Varnish
sudoedit /etc/default/varnish

Look for lines that are not commented in "Alternative 2" and change DAEMON_OPTS to port 80.


Save that file and exit after two port changes. You can check if default.vcl file is set correctly. Default port should be 8080, if not change it to 8080.

sudoedit /etc/varnish/default.vcl


Step three. Configure Apache.

sudoedit /etc/apache2/ports.conf

We told Varnish to listen port 8080 but Apache default is set to 80 so we have to change that. Change to both virtual and listen 8080.


And as always after making changes, kick the demons.

sudo service apache2 restart
sudo service varnish restart


Now open your browser and type localhost to see if your setup is working correctly. If not you can try changing all * marks from setting files to 127.0.0.1

Testing Varnish

First stop your Varnish
sudo service varnish stop
Apache benchmark your Wordpress 

ab -n100 -c100 http://localhost:8080/~shnigi/wordpress/


As you can see it is not very fast. Then start Varnish again
sudo service varnish restart
And do the same test again but not in the port 8080
ab -n100 -c100 http://localhost/~shnigi/wordpress/


And as you can see Varnish + Apache is a lot faster than without Varnish! Static page is an advantage. Remember to check that commenting and other dynamic things work normally. 

Source: https://www.digitalocean.com/community/articles/how-to-install-and-configure-varnish-with-apache-on-ubuntu-12-04--3

INFO: Varnish doesn't work on RaspberryPi out of the box. If you somehow mess your Varnish setup and want to return Apache to port 80 you may need to check what program is blocking port 80. Probably Varnish at this point. Use: sudo netstat -tulpn| grep :80 to find out what is blocking that port and then kill it: pkill varnish

Benchmarking Wordpress + Apache (Speed of dynamic and static web-content)

Dynamic web pages allow us to use online stores like Amazon and use pages that relay on dynamic content like Facebook. However static web page is many times faster to serve than dynamic page. That's what I'm going to check out. Is static page an advantage ?

 The setup: I have installed Wordpress and some fake content, and also a static copy of it without dynamic content into two different locations.

http://localhost/~shnigi/wordpress/
http://localhost/~shnigi/wpstatic/static.html

Open Linux terminal and type ab to find out all the functions of Apache Benchmark. With that we are going to see how much faster it is serve a static web page.


Round 1

Lets use parameters -n100, which means 100 connections at the same time and -c100 multiple requests to make. First I'm testing the dynamic page.

ab -n100 -c100 http://localhost/~shnigi/wordpress/


First thing is to look that it completed all the requests. If it would fail it wouldn't matter which page to stress. 
Longest request took 11179 (last line) and time per request was mean. Lets see how the static page does.


And as you can see static page served a way faster than the dynamic... Both pages contain four blog articles but static is definitely an advantage. Lets try only one post. Both my pages are identical. The one in the left is dynamic and the one in the right is static.


Same test parameters again. First dynamic page

ab -n100 -c100 http://localhost/~shnigi/wordpress/2013/10/01/test-post-3/


Then static page.

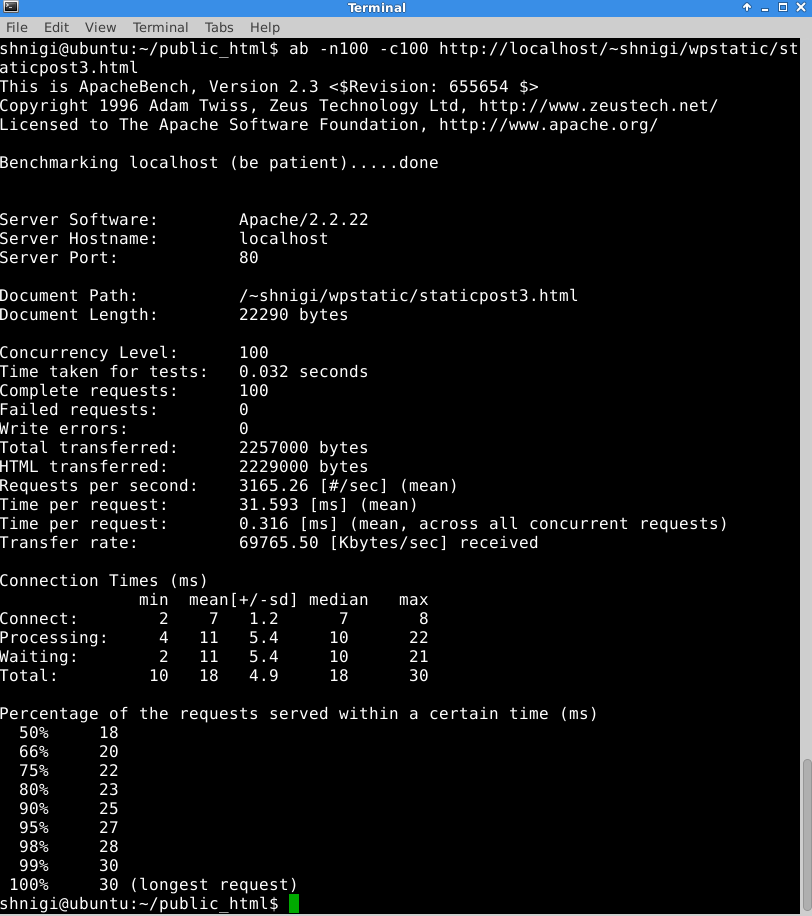
ab -n100 -c100 http://localhost/~shnigi/wpstatic/staticpost3.html


Dynamic content: Time per request 9990 and 9983 for longest request.
Static content: time per request 31 and longest request 30 

Static is definitely faster. In the next post I'm going to install Varnish which is a web application accelerator. It loads the web site into ram memory and updates only once in a second which is not very much. It creates a static copy of the page to serve faster.

With AB user can check performance of any page, for example google.com. To create logfiles automatically use commands below with crontab:

ab -n 100 -c 20 http://localhost/ > benchmarklog-$(date +\%d\%m\%y).txt

ab -n 100 -c 20 http://localhost/ > /home/username/public_html/ablogs/log-$(date +\%d\%m\%y).txt

tiistai 1. lokakuuta 2013

Renting A Virtual Server From DigitalOcean

Our home task was to rent and try some virtual server. I chose DigitalOcean because they have pay for an hour plan and it is very cheap. https://www.digitalocean.com

Create your account from the homepage and choose your billing, either VISA or PayPal.

After payment is accepted select create droplet

From the droplet select your hostname and size (how much ram, disk space, transfer rate) If you are going to host website usually the cheapest one is good. Serving web pages doesn't use so much ram and 512mb should be just fine. 1gb should be enough for everything and it has some extra to spare. If your transfer limit gets full you just pay few cents per extra gigs.  

Next select region and your image. You should select region depending where your "customers" will connect your server. For example if people connect your server from USA you should select USA and if people connect from Europe you should select Amsterdam. Image is up to you what you are going to do with the server. Then Create Droplet.


After your droplet is created succesfully you will see information about your server.

And now you can access your server with SSH (Putty in Windows) your password is delivered to your email.


Now it is business as usual. 
Install for example LAMP and Wordpress and start hosting your own site.

I quickly installed Apache2 and tried with the provided IP address. Seems to work well! The IP welcomed me with the apache2 default page. Now I could just buy domain name and start doing business.

I also tried to connect with WinSCP and it worked out of the box. This is nice.

Playing With Wordpress

In the earlier post I installed Wordpress http://nikinlinux.blogspot.fi/2013/08/how-to-install-wordpress.html

To access your wordpress-admin panel type to your browser: yourblog.com/wp-admin/

Some tasks to do:
- Change url type to permalink 
- Change theme
- Backup everything

About permalinks: http://codex.wordpress.org/Using_Permalinks

To setup permalinks

go from the admin panel to Settings -> Permalinks and select your wanted type.

Also open terminal and type:

sudo a2enmod rewrite
sudo service apache2 restart


Permalink should be set if you want someone to link to your post. 

If Wordpress is asking .htaccess file just create that file under wordpress and copypaste the text it offers.

nano .htaccess

 This is the code in my example.
 

Themes

can be simply set under Appearance -> Themes you can manage your current themes, install a new one or create your own. 


However it needs ftp and I don't want to install it on my server. Go for example http://wordpress.org/themes/ and download a new theme or Google a new theme, there are thousands of themes available for wordpress for free. I downloaded a new theme in a zip file so I had to unzip it.

sudo apt-get install zip && unzip
and to unzip the file simply type
unzip filename.zip
then move your unzipped theme folder under wordpress/wp-content/themes
mv attitude/ wordpress/wp-content/themes

Go back to your WP-admin panel and activate your new theme from "Manage Themes" page.


Backup

It's good to have backup. If your page gets hacked or you accidentally delete something you can bring all your posts back from backup file. Wordpress backup file can be created from Tools - Export I created some test data, took backup, then deleted it and bring back with Import. And again if you haven't setup FTP just download the importer manually from wordpress and move it under wordpress/wp-content/plugins


Now you are ready to import the backup file.


I managed to import everything else but one picture.

Question: Again I managed to fail with the chmod command. How I am supposed to set it for wordpress ? Uploading a picture was a problem


UPDATE: create new folder inside wp-content named "uploads" and give FULL ACCESS to that folder chmod 777 uploads

keskiviikko 25. syyskuuta 2013

Reading linux logs

Our homework was to create three error messages and then analyze errors from log files.

SSH-"error"

My first error is not really error, but anyway I installed openssh-server and tried to login without password. Of course that would fail.


Then I started searching ssh logs from /var/log but didn't find anything useful so I did a search

grep -ir ssh /var/log/*

where:
grep = print lines matching a pattern
i = Ignore case distinctions in both the PATTERN and the input files.
r = Read all files under each directory, recursively
(http://explainshell.com/explain?cmd=grep+-ir)

And that revealed the path I should be looking /var/log/auth.log
However everything can be seen from the search so no point opening that file. It clearly says: Failed password for this from 127.0.0.1 port 58216 and so on...


Then my second error is what I came up with the class during apache php installation for all users. (http://nikinlinux.blogspot.fi/2013/04/user-homepages-on-apache.html)

From the part where I have to edit this file "sudoedit php5.conf" I somehow failed editing the file and now my apache won't restart.


 This time I knew the apache2 log file would be under /var/log/apache2 and from there I chose error.log. It didn't reveal anything useful but as you can see from the image above the error message is very clear and I don't need to look log files. There is on </IfModule> without matching start point and when I look my php5.conf file again I noticed I forgot to comment out the last IfModule


One comment there # and sudo service apache2 restart works again!

Third problem: I commented out all cdrom lines from /etc/apt/sources.list file and it is saying failed to fetch cdrom source. It is very clear and I just could remove the cdrom lines from apt because I don't use it.


Once I also encountered dpkg lock error:


This means some other program might be using apt-get. For example if you have package manager open and forget to use sudo before apt-get you can get this error message. You can get this error from other reasons too and to fix that type: sudo rm -fv /var/lib/dpkg/lock to remove the lock and continue using apt-get normally.

I found some log files under /var/log/dpkg.log and /var/log/apt/ history.log and term.log these were not much help because I had to google the answer how to remove lock.


How To Set Up Apache Virtual Hosts

About virtual hosts
Virtual hosting is a method for hosting multiple domain names (with separate handling of each name) on a single server (or pool of servers). This allows one server to share its resources, such as memory and processor cycles, without requiring all services provided to use the same host name.

For example you have one computer which runs apache. Then you set three websites there: test1.com test2.com test3.com and all of the pages can be accessed from Iternet even though the computer has one IP address. 

Set Up
First install apache2


sudo apt-get install apache2

Create new folder where you want to host your pages for example (where -P creates automatically all the parent folders):

sudo mkdir -p /var/www/sivusto1/public_html

(This step is not mandatory if you for example run pages from user home directory.)
Grant user ownership to the folder

sudo chown -R $USER:$USER /var/www/sivusto1/public_html 


Make sure everyone can read your new files

sudo chmod -R 755 /var/www
  
(Continue from here) 

Create new index.html under public_html

sudoedit /var/www/sivusto1/public_html/index.html

Add some test html to the index file

<html>
  <head>
    <title>www.sivusto1.com</title>
  </head>
  <body>
    <h1>Success: You Have Set Up a Virtual Host one!</h1>
  </body>
</html>
 
Save and exit (CTRL + O and CTRL + X)

Here I have created two virtual host pages.


Create new virtual host file

sudo cp /etc/apache2/sites-available/default /etc/apache2/sites-available/sivusto1.com


Turn on virtual hosts

sudoedit /etc/apache2/sites-available/sivusto1.com

Edit the file like this. ServerAdmin for example your name or email, ServerName is the address of your page and ServerAlias is of course alias address, you can add multiple aliases.

<VirtualHost *:80>
ServerAdmin webmaster@sivusto1.com
ServerName sivusto1.com
ServerAlias www.sivusto1.com

From below set the document root:

DocumentRoot /var/www/sivusto1/public_html

Then save and exit nano.


Activate your new host

sudo a2ensite sivusto1.com

to disable host: sudo a2dissite sivusto1.com 

Restart your server


sudo service apache2 restart

You may see and error log during restarting, but it's nothing to worry about


Set up your local hosts (This step is for testing purposes only. It mimics the DNS search and should not be applied in production server)

Open your hosts file with:

sudoedit /etc/hosts

And create lines:

#Virtual Hosts 
computeriphere sivusto1.com
computeriphere www.sivusto1.com


Save and exit nano. Now it's time to try your site. Open browser and type either sivusto1.com or www.sivusto1.com and your page will load!


Original instructions: https://www.digitalocean.com/community/articles/how-to-set-up-apache-virtual-hosts-on-ubuntu-12-04-lts

Questions: Can I insert all the pages to the default file and not duplicate it every time ? Answer: probably yes, but it is easier to maintain available sites with different files.

My personal virtualhost setting with Varnish:

<VirtualHost *:8080>
        ServerAdmin niki.ahlskog@gmail.com
        ServerName nikiahlskog.com
        ServerAlias www.nikiahlskog.com
        DocumentRoot /home/niki/public_html/

        <Directory />
                Options FollowSymLinks
                AllowOverride All
        </Directory>
        <Directory /home/niki/public_html/>
                Options Indexes FollowSymLinks
                AllowOverride All
                Order allow,deny
                allow from all
        </Directory>

</VirtualHost>

Other example:

<VirtualHost *:8080>
          ServerAdmin niki.ahlskog@gmail.com
        ServerName nikiahlskog.com
        ServerAlias www.nikiahlskog.com
        DocumentRoot /home/niki/public_html/

        <Directory /home/niki/public_html/folder/>
                Options Indexes FollowSymLinks
                AllowOverride All
                Order allow,deny
                Allow from all
        </Directory>
</VirtualHost>