sunnuntai 31. maaliskuuta 2013

Tomcat on RaspberryPi

Original tutorial:  MacGyver Development

We are doing a dynamic web project in school and we needed a Tomcat server. I then wanted to host the page myself because I wanted to learn everything from 0 to 100.

Raspberry Pi is little slow to read from MySQL but the price for this server is so low that it doesn't matter for me. Also Pi is completely silent and very small.

Here's what you need to do to make Tomcat 7 run.

Tomcat obviously need Java:
$ sudo apt-get install openjdk-6-jdk

Clean up your installs to save some space on the SD card
$ sudo apt-get clean

Now, download, unpack and install Tomcat (notice that the version number may have been changed)
$ wget http://mirrors.axint.net/apache/tomcat/tomcat-7/v7.0.35/bin/apache-tomcat-7.0.35.tar.gz
$ tar xzf apache-tomcat-7.0.35.tar.gz
$ cd apache-tomcat-7.0.35/conf
$ nano tomcat-users.xml

Add a user to the authorization file, directly below <tomcat-users> add
<user username="system" password="raspberry" roles="manager-gui"/>

Now start Tomcat
cd ../bin
sudo sh startup.sh

Now you have a Tomcat server on your PI. Surf to the Tomcat console: yourIP:8080
example http://192.168.1.90:8080/ You can check your IP with $ ifconfig command

It takes a short while to warm up the server but then you can login via Manager App.

Static IP address

Why I want to set a static IP address ? More from Penguintutor.

If you want to host a website that others can see, you have to have static IP address. By default computer will request a dynamic IP address which is issued by your router as required. That means your IP address may change in future which would make it hard to connect to the webserver. Instead we set it to something that doesn't change. For example if you have a dynamic IP your servers address could change in every day and no one wouldn't know where it is. First find out what DHCP address has been allocated by using the ifconfig command.

$ ifconfig

under eth"number" eth0 for example, look for line which says something like:  inet addr:192.168.1.110. This is saying that the ethernet port 0 has an IP address of 192.168.1.110. This is your computers address in the home network. Notice that every computer needs its own unique IP. If two computers has the same IP address internet doesn't either work or it works randomly. You will also need to find out what address your router is, using the route command

$ route
Under "Default Gateway" you find an IP address and that is where all traffic is sent via.

Now you need to check on what address range is being issued by the router. I suggest to check Portforward.com it has a list for many routers and programs which port they should use. And how to apply ports. I have used 3 different routers and have always found instructions for my router and specific programs.

Leave that for now. To change to static IP address in RaspberryPi
$ cd /etc/network 
$ sudo nano interfaces

replace the line “iface eth0 inet dhcp” with "iface eth0 inet static" 
check it has a nameserver enty pointing to your default gateway. Set the address to unique address on your home network. Look the images from Penguintutor. Reboot is suggested after IP change just to make sure everything is ok. 
$ sudo reboot
After logging in check using $ ifconfig to confirm that you have a static ip address.

Now back to the router thing. You should locate your router by pointing your browser to it. Mine example works with 192.168.1.1. You should find something that says "applications" or "virtual server". Again look for portforward.com
You should select right ports for your program and then set the computer which can use the ports. After that your server is visible on the public network.

LAMP - Linux, Apache, MySQL, PHP

Original tutorial: Penguintutor

I wanted to install LAMP stack to my RaspberryPi, because I wanted to host websites, files and other stuff. Your computer has to have static IP address to succesfully host websites available for anyone. Read more about static IP address on my next post.

My Pi has 512mb ram memory. However it is shared between the graphics and main system memory. By default 64mb is allocated to graphics. This is overkill if you don't plan to run the graphical interface as in the case of a server. To reduce the amount of memory available for graphics to 32mb enter the following command.

$ sudo cp /boot/arm224_start.elf /boot/start.elf
or use sudo raspi-config to do this using the config menu

First we install Apache webserver. But before that make sure you have updated the repositories to make sure that your computer knows about any new packages or versions available, with:
$ sudo apt-get update
Then install the Apache with:
$ sudo apt-get install apach2

Now you could basically host websites just putting them under /var/www 
to test that the Apache is working open your browser and surf to http://localhost/ you should see apache welcome message. You can also put directories to www folder and locate them with browser by typing example http://localhost/testpage

Installing MySQL
$ sudo apt-get install mysql-server

During the install there is a prompt request for a password.
The password is for the mysql root user.

Installing PHP version 5 and the mysql libraries to allow PHP to access the mysql database.

$ sudo apt-get install php5
$ sudo apt-get install php5-mysql

Completed
Once the setup is completed you can acces the web page by pointing your browser to the router IP address or DNS entry. 

To test that the webserver and PHP are working correctly then delete the file /var/www/index.html and create a file /var/www/index.php with the contents of this page.

To enter phpmyadmin panel go to http://localhost/phpmyadmin

Raspberry Pi - Credit-card sized computer

I wonder how I heard about RaspberryPi just a while ago. Anyway I bought it because it seemed very useful for me. I wanted to learn more about Linux and using it as a server. I also bought a plastic box for the Pi. I got mine from Partco.

First thing was to format a memory card for the Pi and install Linux. I found good instructions from ruuvipenkki (in Finnish) but in short for WINDOWS users:

1. Get newest Raspbian linux from http://www.raspberrypi.org/downloads
2. Download Win32DiskImager from the same site and install it.
3. Put SD card into your computer and unzip the disk imager.
4. Open the disk imager and locate your raspbian image.
5. Click write. When the installation has completed succesfully it says "write succesful"


next steps:
1. connect all the needed cables to Pi but do not connect the power plug yet.
2. Insert memory card.
3. Now connect the power cable. It acts as a power button for the Pi. If it is plugged in the computer turns on and if it is plugged off the computer shuts down. 
4.  Now you should see a Raspbian installation window on your screen.
5. When the installation is completed you should see Pi's config window.
6. You should choose "Expand_rootfs" from the settings by pressing enter. With this you get to use the whole sd card space. 
7. Set the timezone correctly.
8. Enable ssh if wanted.
9. Click finish and the Raspberry Pi restarts.


Next:
1. When you see the: "raspberrypi login" text, username is "pi" and password "raspberry"
2.  If you want to use desktop just type "startx" and the desktop will start.
3. If you don't want to use the desktop, check ssh status with $ service:ssh status command
4. Check Pi's IP with $ ifconfig (this is the address that router has given to Pi)
5. Connect your server from windows example with Putty
6. Change your password with $ sudo passwd root


Puppet Resource Shell

Puppet RAL: original reading http://docs.puppetlabs.com/learning/ral.html

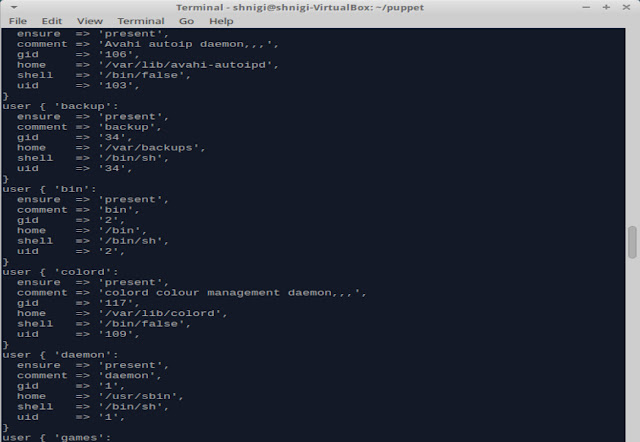
Puppet ships with a tool called puppet resource, which uses the RAL to let you query and modify your system from the shell.

Puppet resource’s first argument is a resource type. If executed with no further arguments…
$ puppet resource user 


… it will query the system and return every resource of that type it can recognize in the system’s current state. You can retrieve a specific resource’s state by providing a resource name as a second argument.

$ puppet resource shnigi


You can get help for any of the Puppet executables by running them with the --help flag, but it’s worth pausing for an aside on puppet describe’s -s flag.

torstai 28. maaliskuuta 2013

Puppet helloworld!

Tero's updated and better tutorial for helloworld: http://terokarvinen.com/2013/hello-puppet-revisited-%E2%80%93-on-ubuntu-12-04-lts

If I understood right, Puppet is simply a text file that describes the desired state of the computer. It can be used to automate repetitive tasks, quickly deploy critical applications, manage and change from 1 to 1000's computers at the same time. First define the desired state of the infrastructure's configuration, then simulate that it works before enforcing, then enforce the deployed desired state automatically and lastly it reports on the differences what happened.

Original instructions: http://terokarvinen.com/2012/hello-puppet-on-ubuntu-12-04-lts

Update repositories and install Puppet
$ sudo apt-get update
$ sudo apt-get -y install puppet

Make a new folder for puppet, mount it, make folder for manifests and create a new file with nano.
$ mkdir puppet
$ cd puppet 
$ mkdir manifests 
$ nano manifests/site.pp

Write this to the file:
file { '/tmp/helloPuppet':
content => "Lets see if puppet works. "
}

Invoke Puppet:
$ puppet apply --modulepath modules/ manifests/site.pp

See the results:
$ cat /tmp/helloPuppet
$ Lets see if puppet works.


And what actually happens. We create a new folder "puppet" on the desktop, mount it, create new folder inside puppet named "manifests" and there we create file named site.pp and again if I understood this is for testing puppet without client and a server. Puppet language is added inside the site.pp file /tmp/helloPuppet etc.. and content is what we print out with cat command. And that creates a plain text file in tmp folder. Nice.

Create a file in tmp that only root is able to use:

  file {'testfile':
      path    => '/tmp/testfile',
      ensure  => present,
      mode    => 0640,
    owner => 'root',
      group => 'root',
      content => "Here I am.",
    }

This post is for Puppet course: http://terokarvinen.com/2012/aikataulu-linuxin-keskitetty-hallinta-ict4tn011-3#comment-19666

Nagios - system monitor

http://www.nagios.org/

Nagios is an open source computer system monitor, network monitoring and infrastructure monitoring software application. Nagios offers monitoring and alerting for servers, switches, applications, and services. It alerts users when things go wrong and alerts them again when the problem has been resolved.

Setting up tightvnc on RaspberryPi

http://myraspberrypiexperience.blogspot.fi/p/setting-up-vnc.html

Vagrant - Create and boot new virtual machine in minutes

Installing Vagrant:

$ sudo apt-get -y install vagrant
$ vagrant box add lucid32 http://files.vagrantup.com/lucid32.box
$ vagrant init lucid32
$ vagrant up
$ vagrant ssh

After running the above two commands, you'll have a fully running virtual machine in VirtualBox running Ubuntu 12.04 LTS 32-bit. You can SSH into this machine with vagrant ssh, and when you're done playing around, you can remove all traces of it with

$ vagrant destroy

To have vagrant with LAMP stack ready for developing, use my Vagrant script here: https://github.com/shnigi/Vagrantbox

It has private IP set to 192.168.33.15. Then edit your /etc/hosts file and add for example:

192.168.33.15 mypage.dev

Then you can use your host computer and type mypage.dev and it redirects to your vagrant host apache page. It should also add /var/www  as a shared folder so you can copy and paste files directly to your vagrant box. 

Useful Linux commands

Useful commands:

Create folder: mkdir name
Delete folder: rmdir name
create multiple folders named a,b,c,d...z: mkdir {a..z}
create file: cat > test.txt
deleting file: rm -f -r {file-name}

Where,
-f: Forcefully remove file
-r: Remove the contents of directories recursively 


Remove / Delete directory called /tmp/foo

Open the terminal. Type the following command:
$ rmdir /tmp/foo

Recursive removal

Remove all files and directories (recursive removal):
$ rm -rf /path/to/directory
$ rm -rf /tmp/foo

 
create multiple files named a1,a2,a3..a10: touch a{1..10}.txt
add user: adduser testuser
delete user: userdel testuser
change user password: passwd username
list files: ls
list also hidden files: ls -a
mount foulder home: cd /home
cd to user folder: cd username
recursively delete folders: rm -r directoryname
add group: groupadd groupname
delete group: groupdel groupname
print working directory: pwd
exit on line terminal: ctrl + C
show useful information about computer: facter

Install ssh-server (every user has shell acces by default):
sudo apt-get install openssh-server

remove installed app:
sudo apt-get remove apache2*
apt-get purge apache2  /will remove all config files

acces ssh: ssh username@localhost

Good place to know:
/etc/hosts 

Remove all things related to specific app:
sudo apt-get --purge remove apache2
Find all related config files for specific program:
dpkg --listfiles munin-node